Building a CNC-Machined Miniature Engine Masterpiece
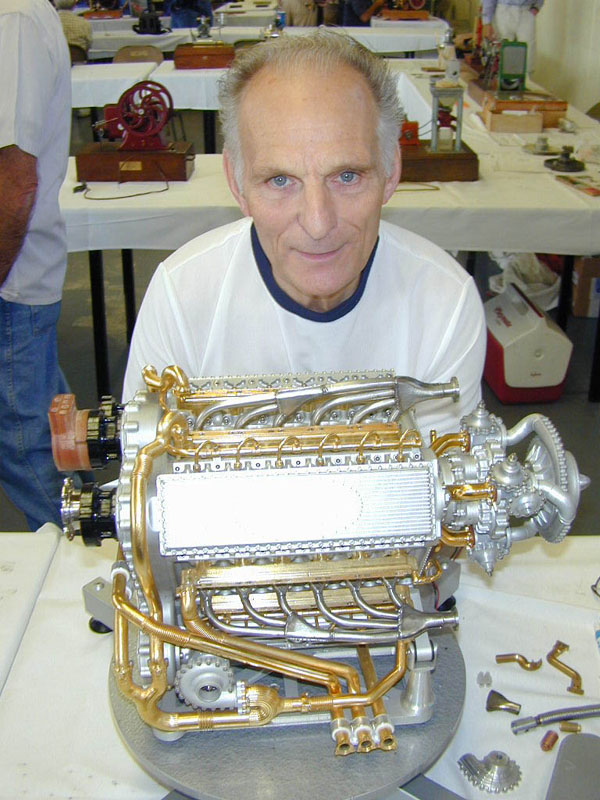
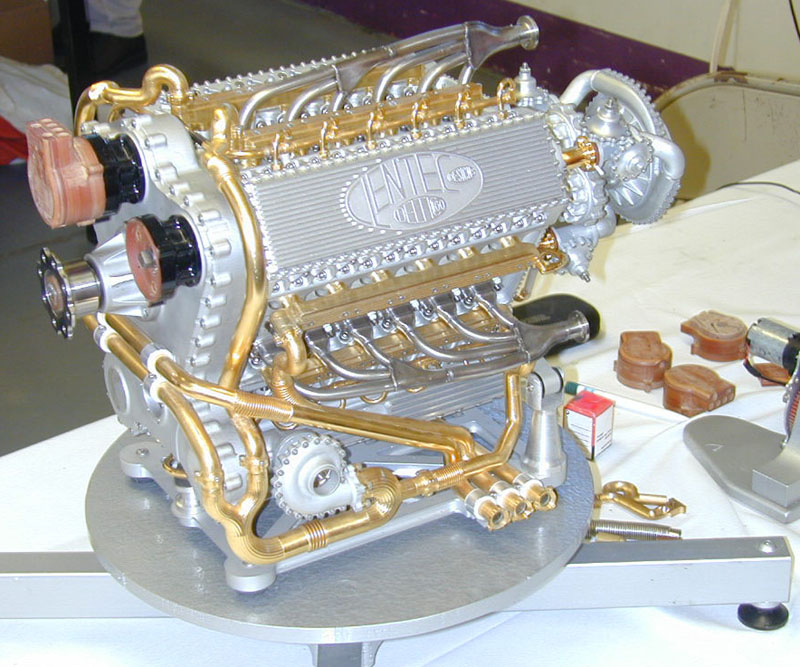
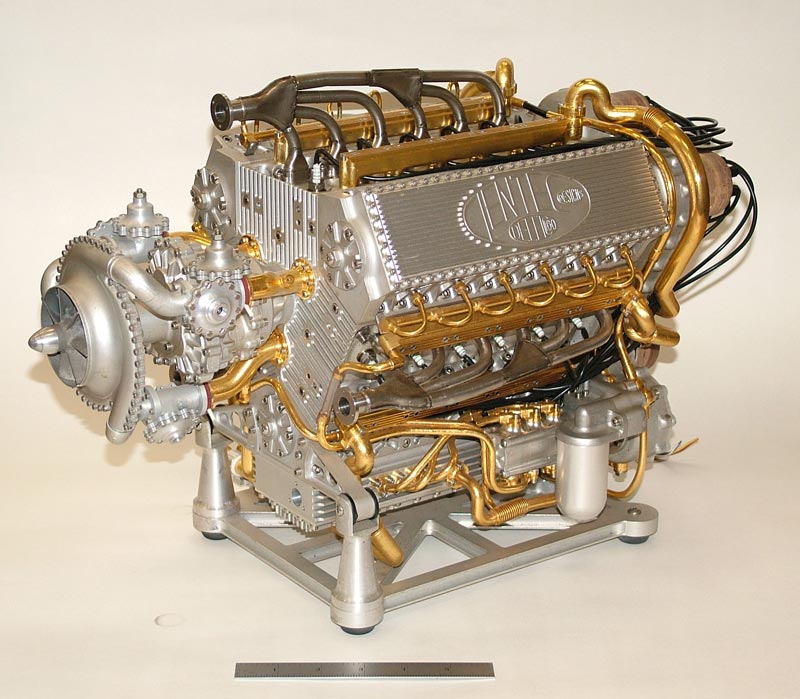
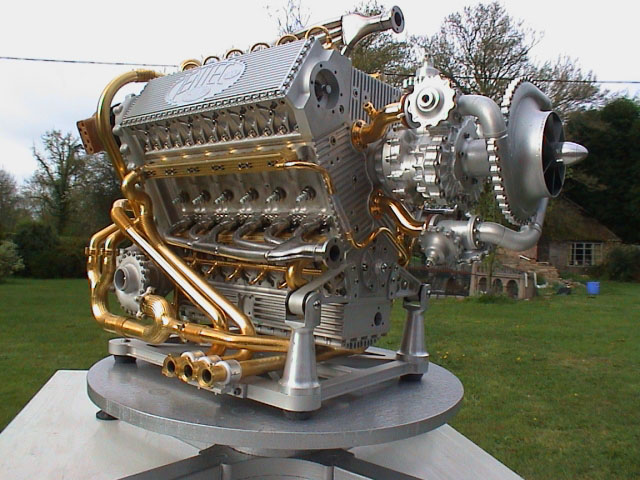
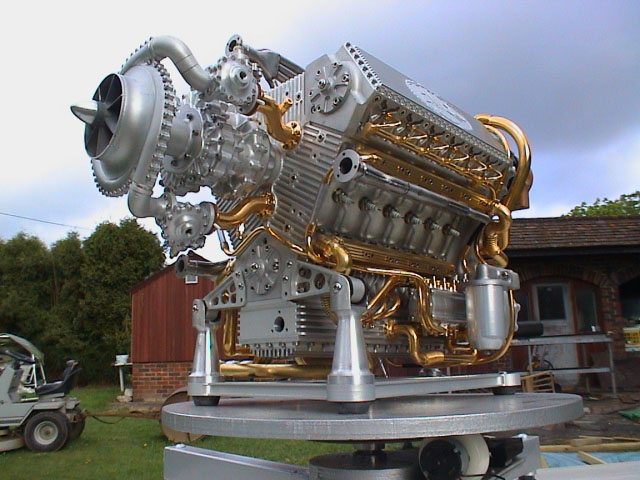
In 2003, Clen Tomlinson displayed his nearly completed Napier Deltic 18-cylinder engine at the Pacific Rim International Model Engineering (PRIME) show in Oregon.
Introduction
When museum founder Joe Martin first added Clen Tomlinson to the list of artisans to be recognized on our website, he did so with the express interest of answering one question: “Is a craftsman still a craftsman if they use CNC tools along with CAD/CAM programs?” Mr. Martin noted that it took just one glance at Clen’s magnificent project (which was still in the works at the time) to see that the answer was a definitive yes. He added that, “In the hands of a great craftsman CNC is just another tool, and Clen deserves the same amount of respect as any great craftsman.”
Joe Martin went on to say, “What especially impressed me about Clen and his project was that he wasn’t a youngster who grew up in the computer age; he was a craftsman who was willing to take on a seemingly impossible project and use every tool at his disposal to accomplish his goal. I’m looking forward to the day when Clen’s engine roars to life.”
Impressive Engine Garners Attention at a Model Engineering Show
While looking at the engines on display at the 2003 PRIME show in Oregon, Joe Martin was particularly impressed with the work of Clen Tomlinson. The model engine project that Clen was taking on was no small task, yet the finishes on the model were simply superb. The engine itself is a Napier Deltic 18-cylinder, which is a very unique and complicated motor. Although it was not complete at the time, we felt that it was worth sharing Clen’s progress on such a remarkable undertaking.
Now, another factor that makes Clen’s project unique to our museum is that it was machined almost completely using modern CNC technology. In general, we have excluded most CNC work in favor of hands-on craftsmanship that keeps away from computer-controlled tools.
However, in Clen’s case we have made an exception for two reasons: 1.) The level of complication in this model means that even with the help of CAD and CNC to make the parts, the knowledge and skill required to actually program and execute the operations was in some ways more demanding than making them by hand. 2.) CNC machining is the way that most machine shops now operate, and the way that many craftsmen are making parts.
As projects get more highly technical, some parts (like turbine blades) simply cannot be made without the help of computer control. What you see in Clen’s work is a potential preview of the direction that model engineering may be headed in the coming decades
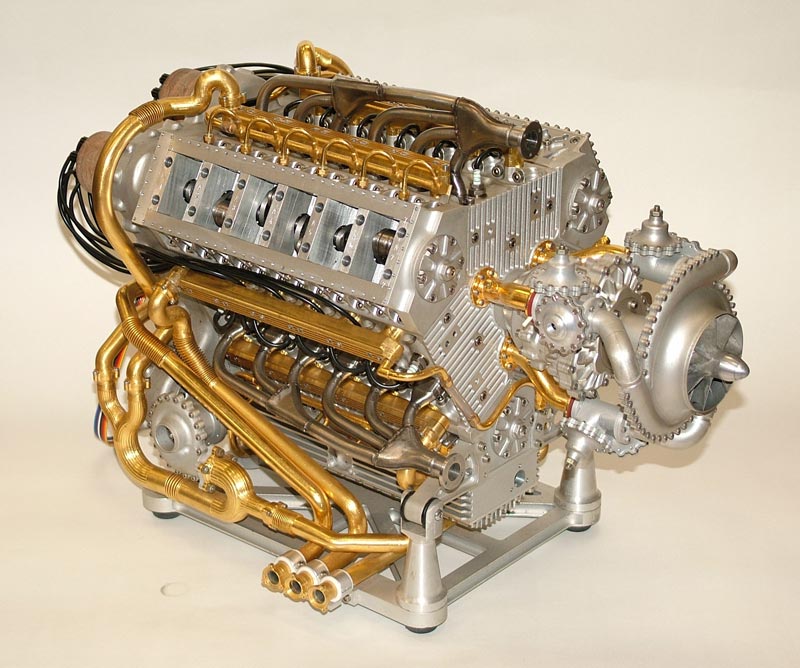
Clen’s model Napier Deltic engine is shown here at the PRIME show in 2003. The engine was nearly completed at this point.
Biography
Technical Training Lays the Groundwork
Clennel “Clen” Tomlinson is a retired electro/mechanical engineer living in West Sussex, England. He started his working life as an apprentice in the motor vehicle industry, and is qualified as a Motor Vehicle Technician. Clen has experience working with cars, motorcycles, commercial vehicles, agricultural tractors and equipment, and civil engineering plants and equipment.
With his background, Clen has designed and built many special purpose machines, including race cars and bikes. Clen has also managed sport and race car departments. Sometime in the middle of his working life, Clen also spent two years in National Service (a peacetime conscription) for the Royal Air Force. He spent 13 months in a classroom being trained as an aircraft flight and navigation instrument technician. Clen noted, “I learned more in that period of my life than in my life to that point!”
In the mid 1960’s, Clen decided to make a career switch to scientific manufacturing. He spent three years making small, high-speed (500,000 rpm) turbines and free piston engines that were used in cryogenics for liquifying helium. Then, Clen received more training in education and joined a large manufacturing company to set up and run an engineering training school.
Clen progressed to Group Training Manager, and eventually to Group Personnel and Training Manager. The company designed and built large electro-magnets for atomic particle physics research. Clen specialized in the new manufacture and refurbishment of underwater weapons. He also designed and built ion implanters for the electronic manufacturing industry.
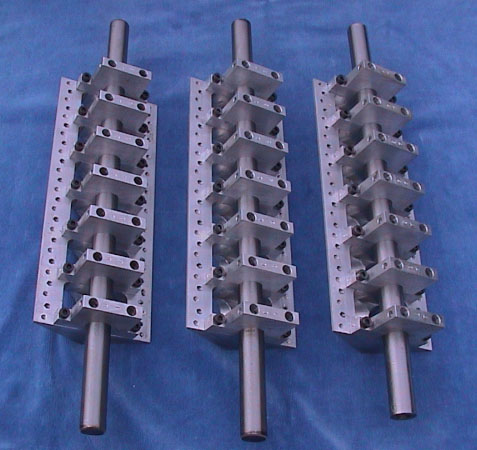
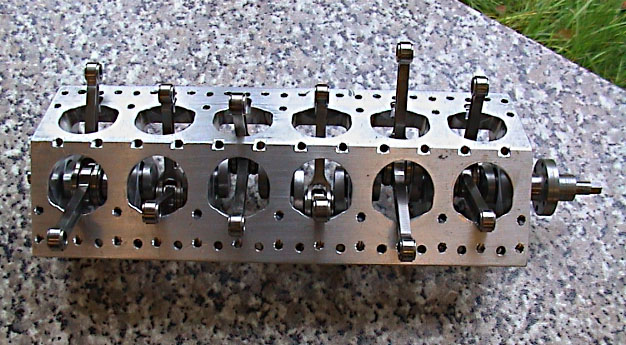
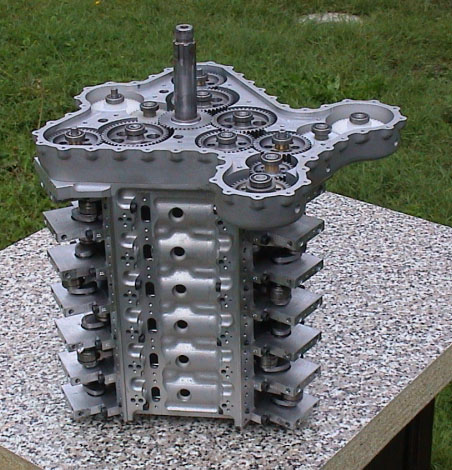
Three crankshaft main bearing frames. The main bearing frames are the center of the crankcases, which form the “corners” of the triangle. The bearing frames bolt to the three cylinder block assemblies to form the main structure.
In the early 1970’s, Clen joined up with three other senior managers to set up a new company operating in similar areas. The company developed into one of the leading magnet manufacturers in the world. As Engineering Director, Clen was responsible for the tendering, design, and manufacture of tooling. He designed and built large resistive and super-conducting magnets, as well as associated equipment for atomic particle and fusion physics research projects.
Over the course of his career, Clen has been involved in many projects in the US, including the Brookhaven National Laaboratory in Long Island, New York. He also worked for the NAL in Chicago, and helped with the super-conducting super collider for Boeing in both Texas and Seattle, WA (as part of the Starwars Program).
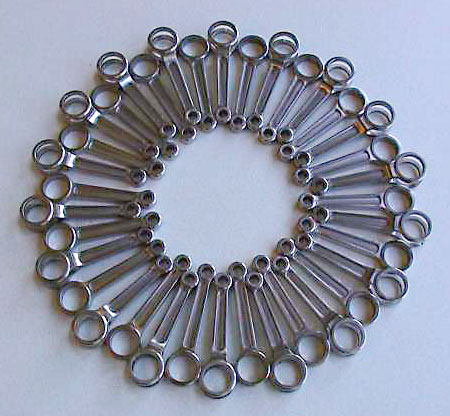
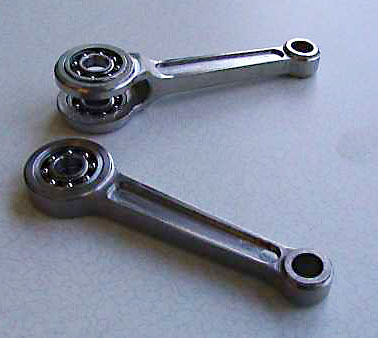
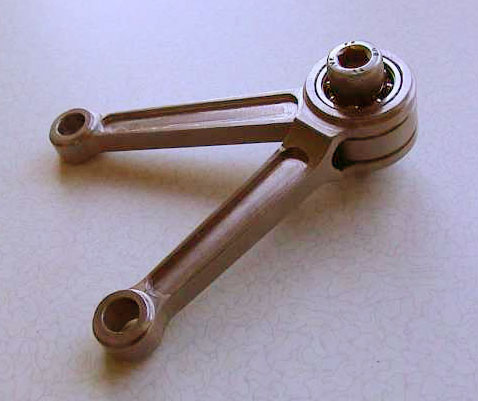
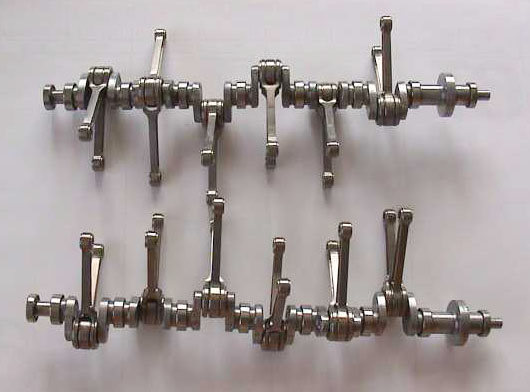
Shown here are 36 connecting rods for the Deltic engine. There are 18 inlet and 18 exhaust connecting rods of the fork and blade design. They are only 48 mm centers, and were machined from titanium. Each big end carries two miniature ball races—two together in the inlet, and one on each side of the exhaust. The rods are so small that split big ends were out of the question, hence the built-up crank design.
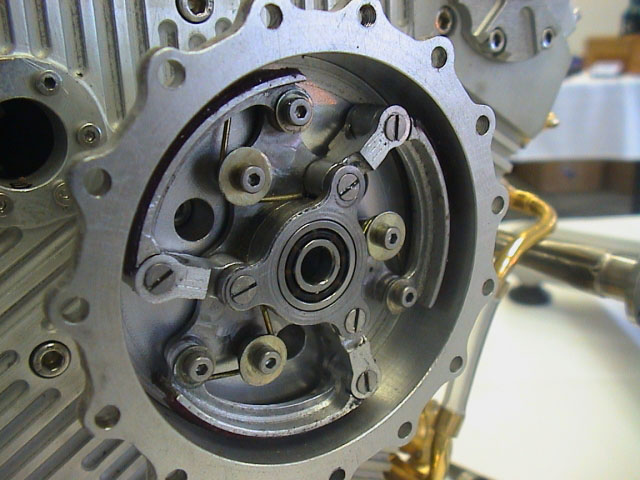
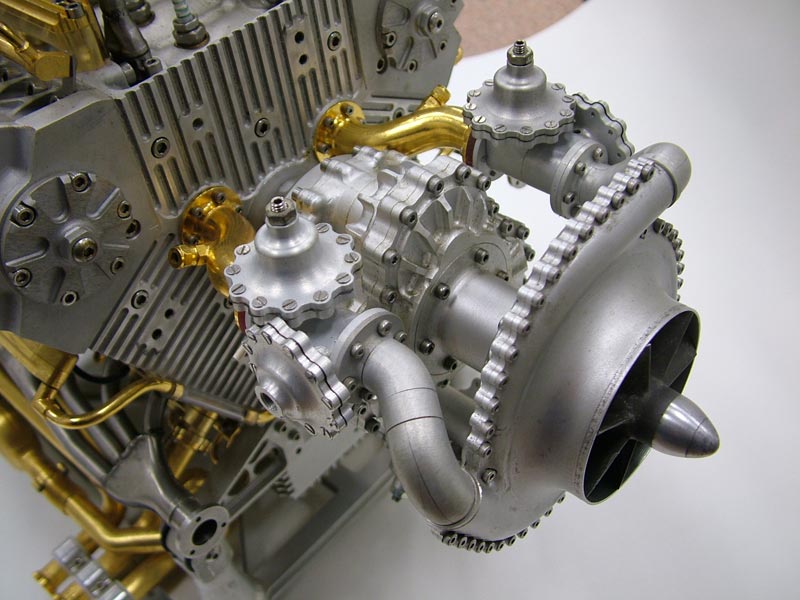
This is the blower drive one-way centrifugal clutch. The blower is driven from the rear of the output shaft via a long flexible shaft through a six times step-up gearbox. This engine carries no flywheel and accelerates/decelerates very quickly. Clen felt that it was necessary to add extra protection.
Hobbies With a Technical Slant
Now, Clen has always been making things, including many relatively simple model engines, both steam and internal combustion. In retirement, Clen was slowly developing his workshop and enjoying life. Unfortunately, his wife suddenly passed away in 1999. Clen said, “I needed something to totally occupy my head for some time, and that is where the Deltic came in. I had been thinking about it for some time!”
In 2003, Clen was also completing the restoration of a 30 year old BMW 30csi coupe that he’s had for over 20 years. Even before completing the Deltic engine, Clen already had his mind set on the next project. He wants to build another Napier engine, the Sabre. This is a 24-cylinder, “H” sleeve valve unit. At the time of this writing Clen was still working on the design, and he noted that it was quite a challenge!
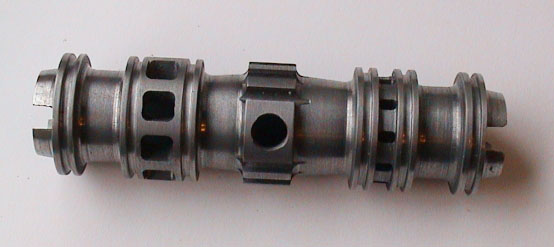
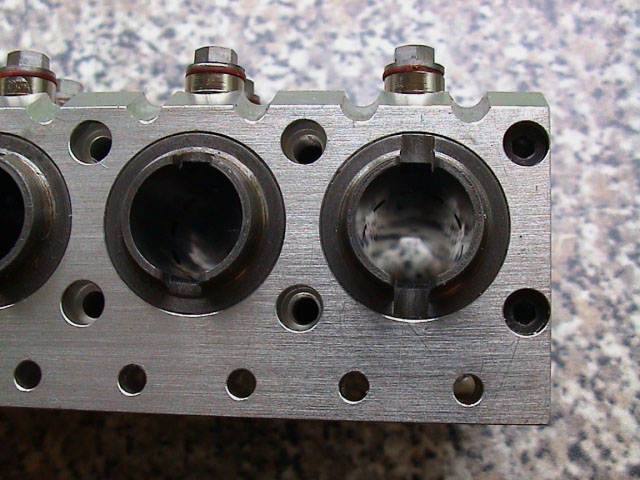
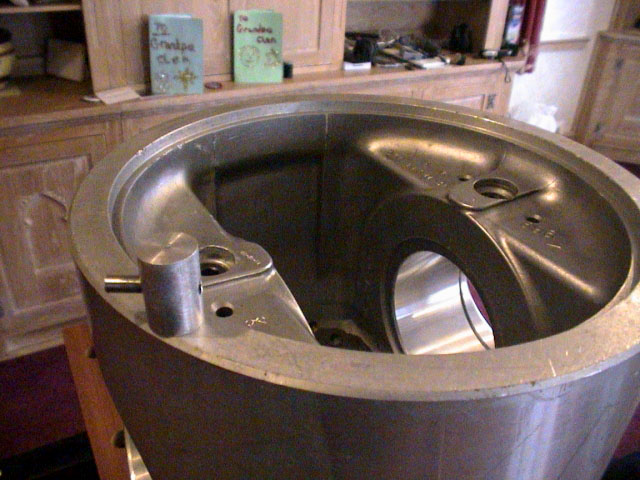
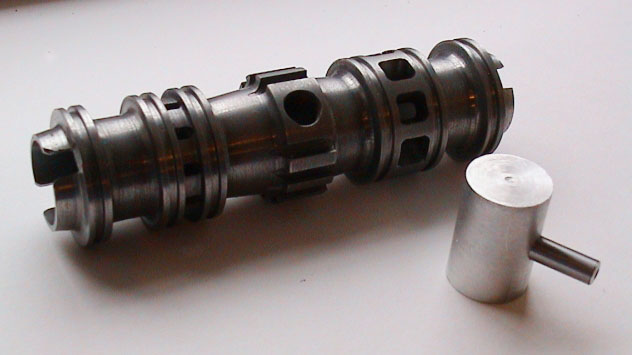
A cast iron cylinder liner for the Deltic engine. The liners are a wet type, and carry a series of circumferential “O” rings to separate the water and gasses. They are located in the blocks by a bronze bush screwed into the center section, which houses the spark plug.
Learning New Technologies
More recently, Clen brought us up to date on how he got into CNC machining in the first place. Here is what he had to say:
“I spent most of my working life with a pencil and paper, ‘T’ square, log and trig tables, and a slide rule. I progressed easily to the calculator, but a little more reluctantly to the computer. Toward the end of my working life I couldn’t get an engineer to work for me unless I gave him/her a PC on the desk. I was still writing with a pencil and thinking, ‘All this technology has arrived too late for me.’ Then I thought, ‘Hang on a minute, none of them are that bright. It can’t be that difficult.'”
“Surreptitiously, I put a PC on MY desk. Word processing—no problem! Then there was drafting. This CAD is really impressive, but that’s beyond my ancient brain. Then I thought, ‘Hang on a minute.’ It didn’t take too long and I was doing that, too.”
“On the shop floor, the handles have disappeared from the machines to be replaced by control panels and screens. My God, these kids today are bright! After retirement, I found two Denford educational CNC machines. They had no computers or software, and it became a challenge. I thought, ‘Hang on, etc.’ I had to learn the hard way, but the rest is history as they say.” —Clen Tomlinson
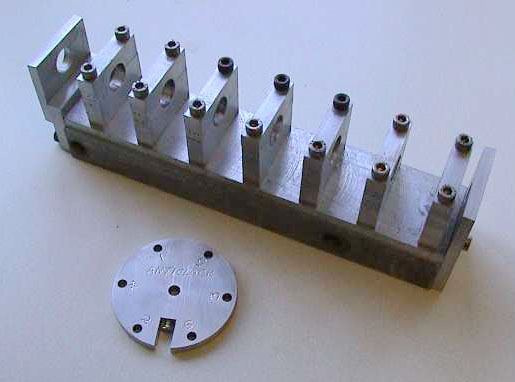
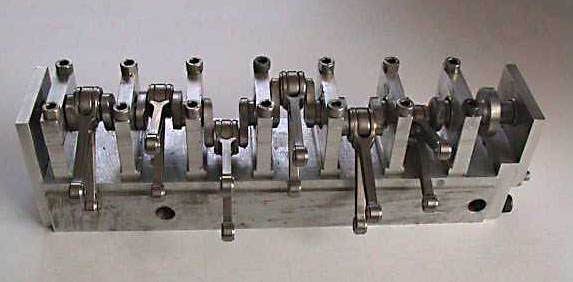
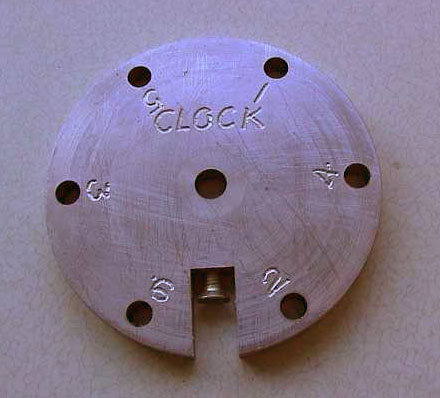
Shown here is the crankshaft assembly fixture that Clen made for the Deltic engine. It’s a relatively simple but accurate assembly system.
Software and Hardware Used
In terms of technology, Clen uses AutoCAD 2000 and tends to draw the toolpaths. He then prints the coordinates and manually programs them into the Heidenhain 151 controller for his Bridgeport Interact 1. However, the Bridgeport was a relatively recent addition to his workshop.
Most of Clen’s Deltic engine was machined on an educational Denford Starmill benchtop 2.5 axis machine. The Denford machine had only 170 mm of travel on the x-axis, and 90 mm on the y-axis. According to Clen, the Denford tooling was also a nightmare.
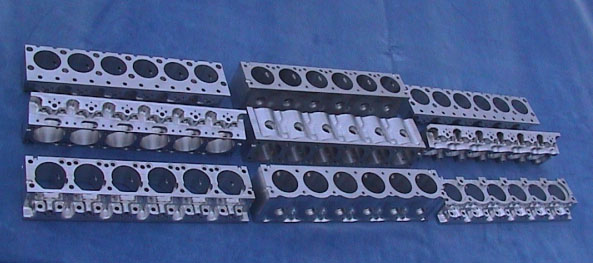
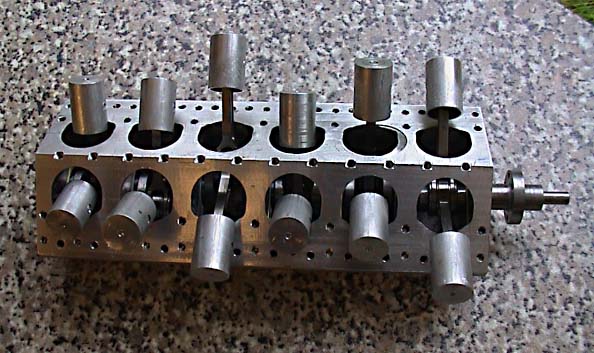
Three sets of cylinder block components. Each cylinder block is assembled from three sections to allow the machining of the internal water, inlet, and exhaust passages.
Making the Napier Deltic Engine
By Clen Tomlinson
Prototype History
The prototype for this model is the Napier “Deltic” opposed piston, 2-stroke cycle, Diesel engine range, used primarily in Naval fast patrol boats and minesweepers today. The engine is also used to power two classes of English Diesel-electric locomotives. The engines were produced as 9-cylinder units (three banks of three cylinders), or as with this model, an 18-cylinder engine (three banks of six cylinders).
The principle has its roots in a German Junkers aero Diesel engine of the late 1920’s-1940’s. This engine was an opposed piston, two-stroke Diesel with 1 bank of 6 cylinders arranged vertically, and two 6-throw crankshafts—one at each end of the cylinders.
D. Napier & Son Ltd. had a license to develop this unit as the “Culverin” aero engine in 1935, but it wasn’t until after WWII that a use was found. By then, the project was in the hands of the English Electric Group, who were looking for a lightweight, high-speed marine Diesel engine.
This application required a couple of inspirational design leaps. The first was the realization that if one more crankshaft was added, then two more banks of cylinders could be added in the configuration of an equilateral triangle.
The second realization was that if you arranged to rotate one crankshaft in the opposite direction to the other two, then the relative phasing of the whole assembly for port timing “fell into place.” This design produced an extremely compact, strong but lightweight unit with almost perfect natural balance.
With 18 cylinders having a bore of 5.125″ and a stroke of 7.25″ per piston (or 14.5″ per cylinder), this engine had a swept volume capacity of 5,384 cubic inches (or 88.3 liters). There were three stages of development from the initial design, with the engine driven blower for scavenging first being turbo-charged.
Then the blower was turbo-charged with charge cooling, and the final stage was “Compounding” using an axial turbo-compressor unit within the triangular central void.
The performance ranged from 1,650 bhp at 1,500 rpm for locomotives, to 2,500 bhp at 2,200 rpm “sprint rating” for FTB’s (bmep 92.lbf/in2) both mechanically blown, to 3,700 bhp at 2,200 rpm (bmep 130 lbf/in2) when turbo-charged and charge cooled. Note that the complex “Deltic Compound” prototype reached 5,600 bhp output when tested in 1956.
The Model
The working model is an 18-cylinder, opposed piston, two-stroke, spark ignition engine. The model is based on, and follows the design principles, of the NAPIER DELTIC Diesel engine to a 1/8 linear scale. The design was produced from a single cross section drawing of the marine version as published in The Model Engineer, plus the bore and stroke dimensions. This drawing was photocopied and enlarged onto several A4 sheets, each with a different scaling factor.
The internals of the engine are to scale, that is, the bore, stroke, connecting rod length, porting positions, and dimensions are accurate to within 5% (rounding off metric equivalents of inch dimensions). This gives a model capacity of approximately 160 cc; hence the “Deltic 160” logo on the crank covers.
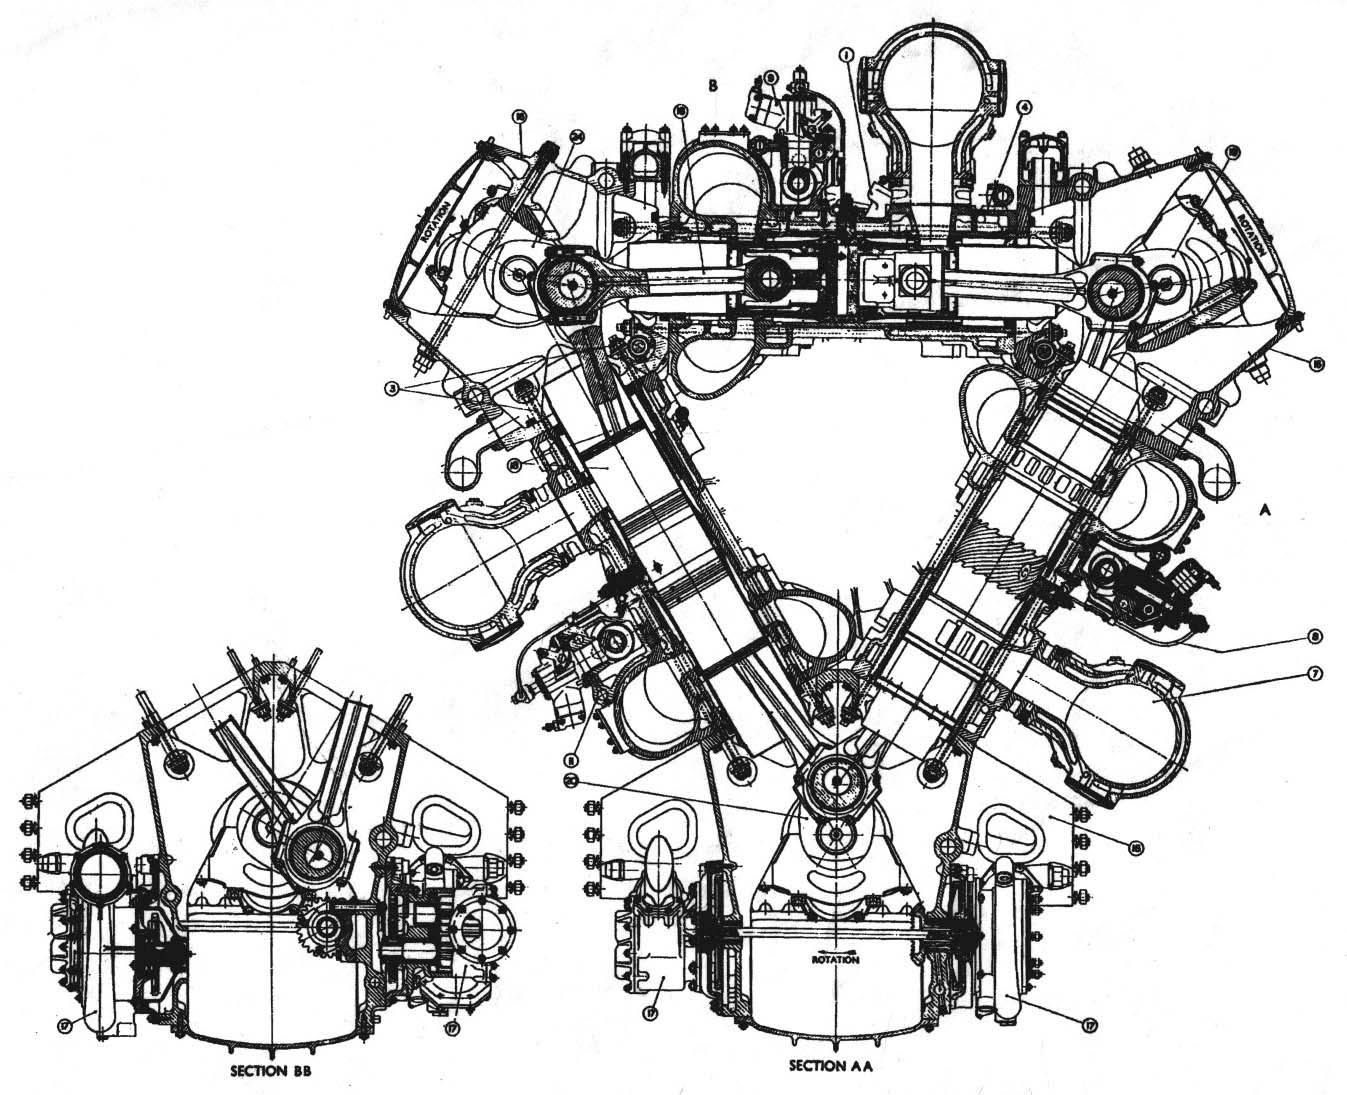
This is the drawing of the Napier Deltic engine upon which Clen based his model. Clen had to enlarge this drawing at several scales to get a full picture of the complex engine.
The following is a list of the major deviations from the prototype design:
1. The cylinder centers have been increased to allow greater cooling volume around each liner.
2. The connecting rods do not have split big ends due to scale space/strength restrictions. This has involved the design of a built-up crankshaft with ball bearing main and big end bearings.
3. Externally, the design has changed to accomodate ignition distributors, spark plugs, and multiple oil pumps (one pressure and three scavenge). A great deal of external decoration has also been added.
The engine has three banks of six cylinders arranged on the sides of an equilateral triangle. There are three “V-12” crankcase assemblies, one at each corner of the triangle.
Additionally, there are 36 connecting rods and pistons, with six pistons operating in one set of cylinders, and opposed by pistons from the crank at the opposite end of that cylinder block. The exhaust and inlet ports in the cylinder walls are “opened and closed” by the pistons.
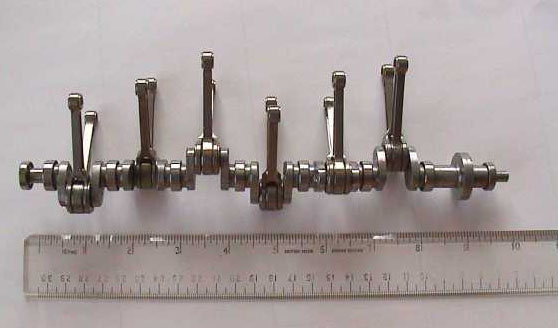
A single counterclockwise crankshaft assembly for the Deltic engine. A ruler provides scale reference for this small but complicated component.
State of the Build
(Keep in mind that the following was submitted by Clen in 2003, before the Deltic engine was completed. The engine has since been fully assembled and finished.)
The model is approximately 90% complete with the major structures in place, including: crankshafts, connecting rods, cylinder liners, timing/phasing gearing, scavenge blower, exhaust manifolds, spark plugs, distributors, oil and water pumps.
There are no castings used. The entire model is machined from solid bar stock, and made to look like castings.
The engine is currently assembled with tight slide fit pistons (without rings) installed to check the accuracy of machining and assembly, and to prove that it is possible to assemble the engine with all piston assemblies fitted to the rods. I am happy to report that it does go together, and that it rotates freely.
The oil pumps together with the full flow filtration system are complete, along with the manifolds for the oil spray to the crankshafts, and scavenge return from the two top crank cases. The water pump, with feed and return plumbing, is also complete. The scavenge blower together with pressure relief and control regulators is now in place. The current project is the ignition equipment. The 18 spark plugs are fitted, and if the engine is to run at the modest speed of 5,000 rpm it will require 90,000 sparks/min.
If it were ever to get to 20,000 rpm (it is tiny inside) that would be 360,000 sparks/min! I am building a six-element infrared optical trigger unit to mount on the end of the bottom crank. Each of these triggers will control one of six CDI modules. The final major project will be the production pistons with the 144 rings—two compression and one oil control. In practice, I may not populate all of the grooves.
Cylinder Block and Liner Assemblies
The cylinder blocks are machined in three parts: the centre section, the exhaust, and the inlet ends. Annular rings around the ports are machined into the mating faces, with the exhausts exiting to the outside as per the prototype, but the inlets to the inside only.
The cylinder liners are machined from grade 17 cast iron, and are of the same design as the prototype with 4 annular grooves machined over the length for cooling water. The two central grooves are interconnected by a series of axial grooves. At each end of the liners and between each annular groove there is an “O” ring. Each cylinder liner has a discrete cooling arrangement with water entering via a drilled hole through the block, and then into the ring to the outer end of the exhaust ports.
Water then passes through drillings in the block to the first of the central grooves, and into the second central groove via the axial grooves. From here it has to pass out of the block on the inside face through external “banjo” fittings to pass over the inlet porting and back into the final annular groove—then out via a final drilling.
The liners are located in position by threaded bushes through the blocks, which also receive the spark plugs. The block assembly is held together by 28 M4 cap head screws threaded into the centre section.
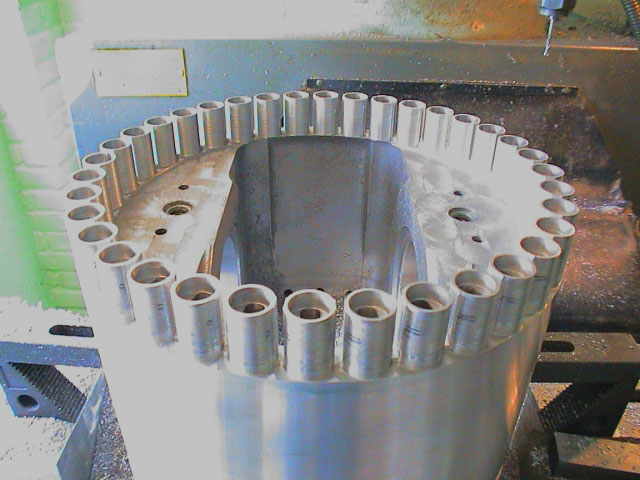
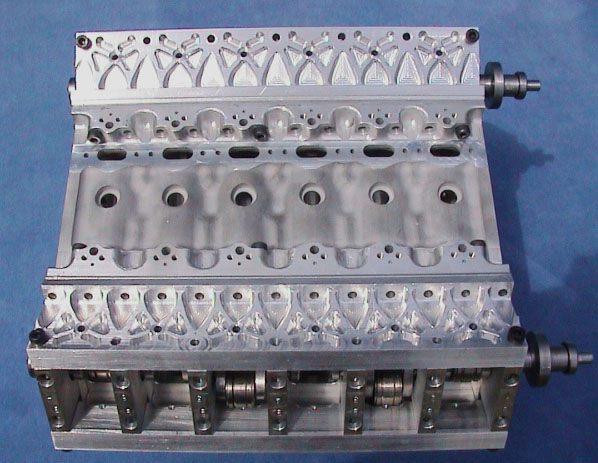
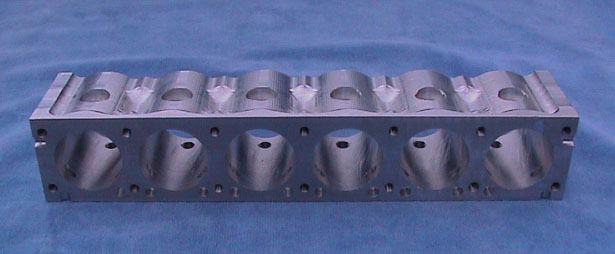
The Deltic cylinder block for center section 2. Several photos like this one show the machining for various gas passages within the blocks. They are secured together by means of cap head screws threaded into the center section.
Crankshaft Assemblies
Due to the relatively small scale and lack of space, it didn’t feel safe to have split big ends to the connecting rods. Therefore, the crankshaft is of the “built-up” design. This has enabled an all ball bearing assembly to be designed. During this process, it was not considered practical to press the components together with the required degree of accuracy.
The assembly is, therefore, bonded together from slide location fit components followed by threaded and bonded pins at each joint. There are three fitted axially at the main bearing to web joints, and two radially at the big ends. Each of the three crankshafts is assembled from 118 components comprising: 7 main bearing shafts; 6 big end shafts; 12 crank webs; 9 main bearing races; 24 big end bearing races; 36 main bearing locking pins; and 24 big end locking pins.
A relatively simple but accurate indexing assembly fixture was used to sequentially bond the components, starting from the drive end and followed by a big end, complete with con-rods and the next main from six down to one. On completion, the assemblies spin freely in the fixture and the main bearing frames.
A single test assembly was first constructed to test the bond strength. This failed at one big end at a static torque of 17 ft/lbs. This is more than adequate to achieve my wildest dreams with regard to power output. With the subsequent addition of the threaded locking pins, I am confident about the static strength of the assembly, but remain apprehensive regarding the high frequency torsional stresses applied to the relatively long and thin six cylinder shafts.
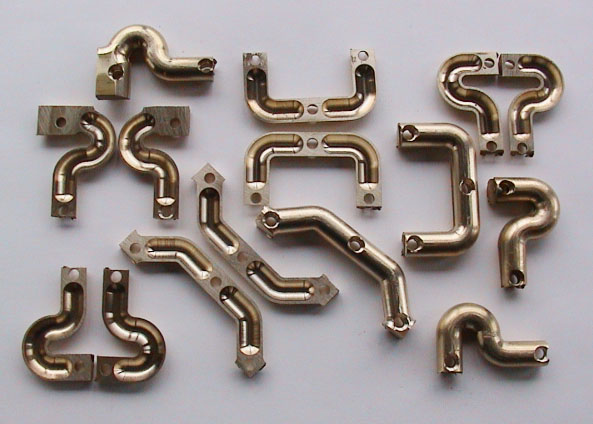
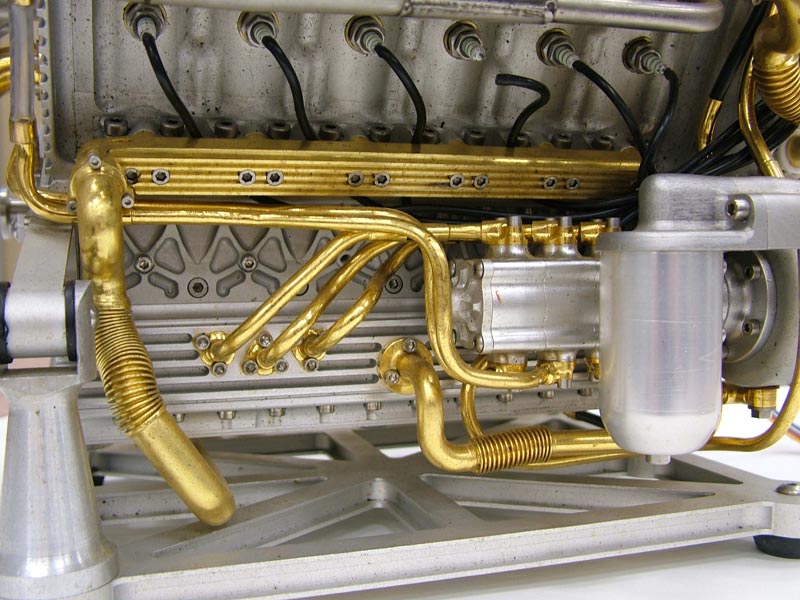
This photo shows Clen’s method for forming the very tight radius bends of the external water plumbing. Rather than actually bending the pipes, the shapes were machined in two halves, and then silver-soldered together to form a pipe.
Timing/Phasing Arrangements
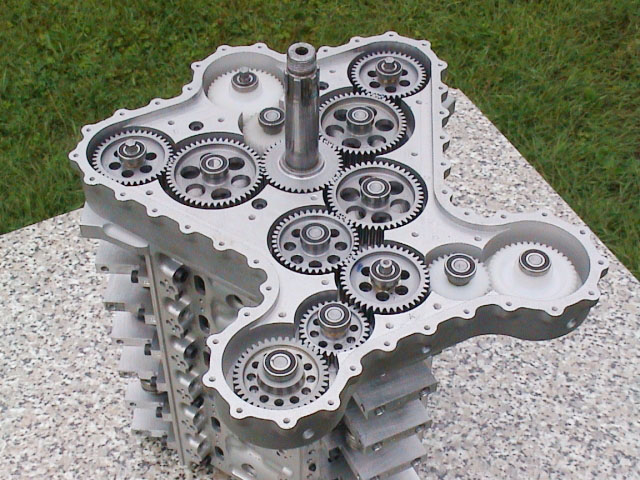
The timing and phasing of the crankshafts was designed to be identical to the prototype. The entire design was taken from the single cross section drawing shown further above. When viewing the engine from the front (non-drive, blower or free end) the cylinder blocks are identified A,B and C clockwise—with A to the left, B at the top, and C to the right.
The bottom crankshaft is therefore designated C/A and runs in the clockwise direction, with A/B and B/C running counter-clockwise at the top left and right respectively. Number 1 big end of each shaft is at this end. All of the pistons are of identical design, but are required to perform the secondary function of opening and closing either the exhaust or inlet ports in the liners. Again, when viewed from the front, the exhaust ports of block A are at the left bottom, those of B are top left, and C are top right.
The firing order for each shaft in my engine follows standard 6-cylinder practice at 1,5,3,6,2,4. They are, however, 600, not 1200 shafts as this is a 2-stroke. Each of the 18 cylinders fires once in every revolution of the engine, or a power impulse every 20°. I have subsequently discovered that the prototype engine has non-standard crank sequences with the order of numbers 6 and 4 reversed, giving the crank order of 1,5,3,4,2,6.
The firing sequence in each triangular bank of cylinders is identical, with cylinders B, C and A firing at 40 degree intervals. The firing intervals per bank are therefore: 0°, 40°, 40°, 280°. The firing order for my complete engine is: C1, A4, B1, C5, A1, B5, C3, A5, B3, C6, A3, B6, C2, A6, B2, C4, A2, B4. For the prototype, all the 4’s should be changed for 6’s, and vice versa.
As with all modern internal combustion engines, the valve timing is designed with “lead and lap.” To this end the exhaust piston leads the inlet piston of the relevant cylinder by 200 of crankshaft revolution. This means that the effective TDC position (i.e. when the crowns of the two pistons in a cylinder are at their closest) does not occur when either of the big ends is at its TDC position. The exhaust is 10° after TDC and the inlet 10° before. It is easier to express all of the port timing in relation to BDC of the piston related crank.
The port timing for my engine equates to: Ex opens 71° BBDC. (68°). In opens 54° BBDC. (53.5°). Ex closes 71° ABDC. (68°). In closes 54° ABDC. (53.5°).
If this corrected in relation to effective TDC, the port timing becomes: Ex opens 81° BBDC. In opens 44° BBDC. Ex closes 61° ABDC. In closes 64° ABDC.
The exhaust period is, therefore, 142° (136°) and the inlet period is 108° (107°). The exhaust lead is 37° (34.5°) and inlet lag is 3° (5.5°). The figures in parenthesis are the actual values from the prototype which are published in relation to exhaust TDC, and have been adjusted to the same base as my model.
—Clen Tomlinson
Finding the Right Materials
Now, it’s always a challenge to source materials for engine components without spending a fortune. For the Deltic pistons, Clen wanted the correct high silicon/low expansion alloy. So he went looking for some scrap pistons from big Diesel engines that he could cut up, and then make the model pistons from the crowns.
Clen’s searches took him to a marine breakers in Portsmouth where he was told they had dismantled some Deltic engines. Unfortunately, he had no luck; however, he did find racks of dozens of brand new pistons for some large Paxman marine engines.
The Paxman pistons are approximately 11″ in diameter and 13″ long. The skirts are 7/8″ thick. Stamped into the inside are the material specs and all QA data. This was perfect for what Clen needed. They cost him £25, but what a bargain! All 36 of the model pistons can fit around the skirt of one of the large Paxman pistons.
Clen is also an associate member of the Bay Area Engine Modelers club of San Francisco, CA. This is how he happened to be displaying his engine at the show in Oregon, and how the model first came to the attention of the museum.
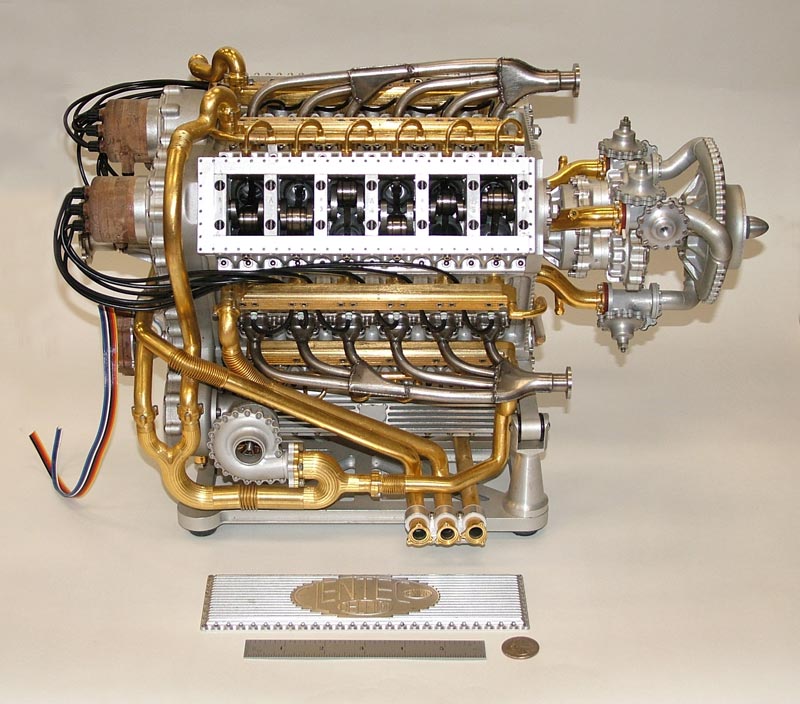
In due time, Clen was able to finish his remarkable model Napier Deltic engine. With the right valve cover removed, the workings of the pistons, rods, and crankshafts can be seen. A six-inch ruler and US quarter are in the foreground to provide scale reference.
Clen Tomlinson’s Napier Sabre—a Work in Progress
By now it should be clear that Clen Tomlinson rarely takes the easy path. His current project is a model of another very complicated engine by Napier—the 24-cylinder, two-cycle Sabre.
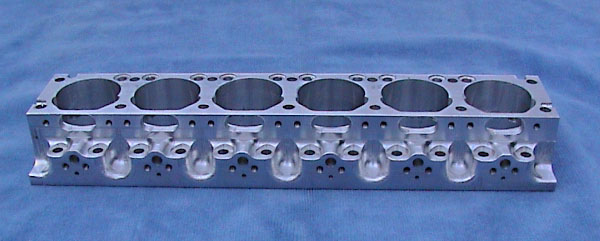
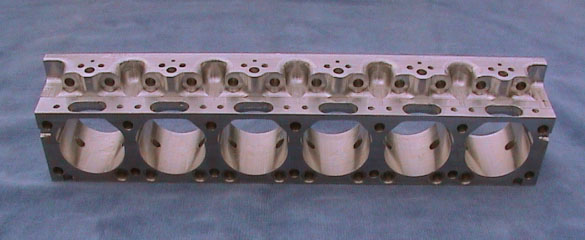
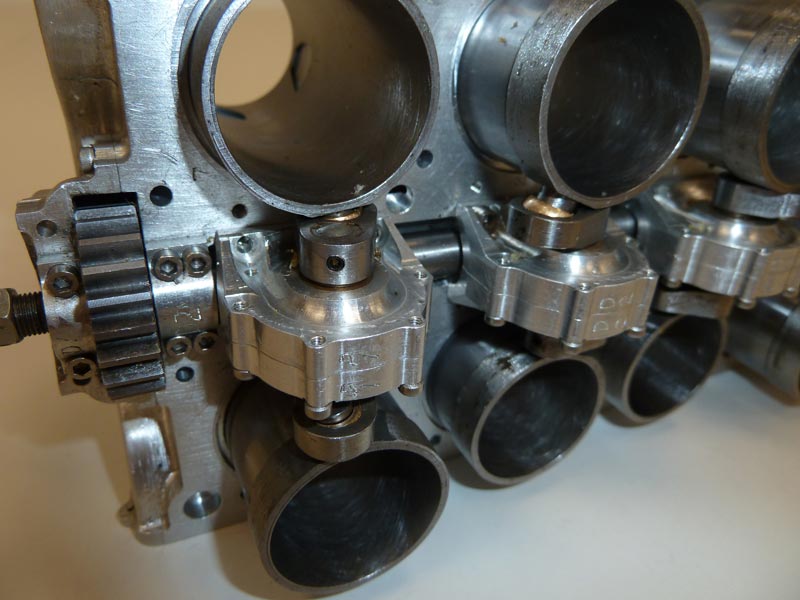
It has two crankshafts, one above the other, each driving twelve pistons in arranged banks of six. Therefore, each cylinder head is six cylinders long and two high. It is a sleeve valve design, where the cylinder sleeves slide up and down while rotating. This exposes the valve openings and the piston cycles within the moving sleeve. The complicated cast cylinder head of the original includes all the passages for air intake, exhaust, and cooling water.
To duplicate this arrangement, Clen machined the passages in layers of billet aluminum using CNC technology. The layers are then fastened together almost seamlessly to make up the head. A complicated gear driven mechanism rotates arms at each cylinder.
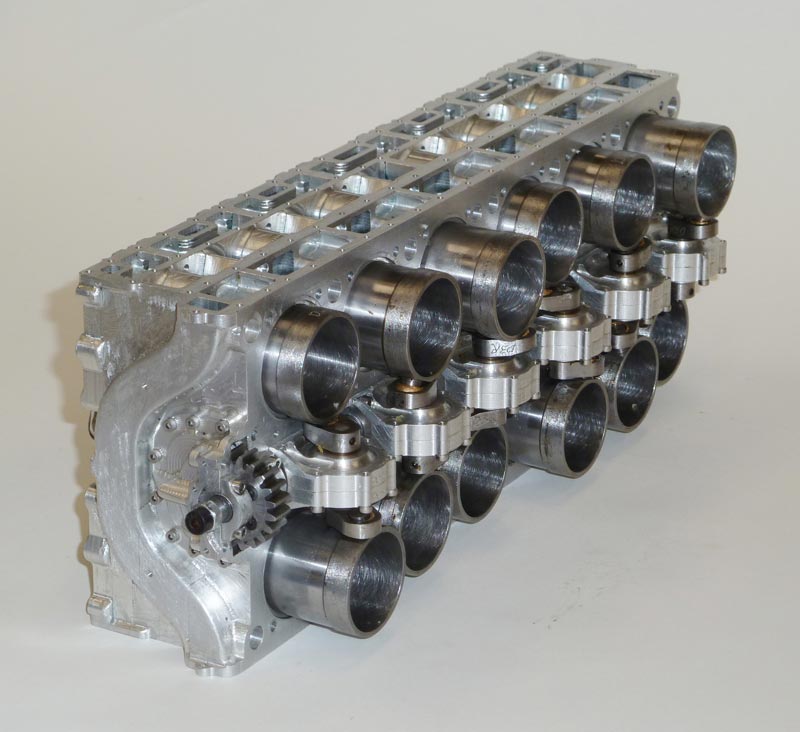
The cylinders have a ball universal joint to both rotate and move the cylinder liners in and out at the same time. The motion almost has to be observed to be understood. Shown below is a “spare” head that Clen loaned us for display at the museum, which has now been returned to him. We look forward to seeing the completed engine one of these days.
Along with submitting his biography, Clen offered some insight into the role of CNC machining for craftsmanship. Read more about Clen’s perspective on CNC machines versus manual craftsmanship.
Additionally, view more photos of Clen Tomlinson’s model Deltic and Sabre engines.

